Terraform のモジュールを利用しAzure 仮想ネットワークとAzure 仮想マシンを作成する
Terraform を使う時、開発環境、ステージング環境、本番環境と各環境ごとに設定内容を変えたり、一度作成したコードを他の構成でも使いまわしたりしたいことがありますよね?そのような悩みを解決するTerraform のモジュールを利用し、異なる環境に応じた仮想ネットワーク、仮想マシンを作成します。


実施環境
| OS/ツール | バージョン |
|---|---|
| Terraform | 1.7.0 |
前提条件
- Azure アカウントを持っていること
- Azure リソースを作成するためのサービスプリンシパル作成などの環境構築が完了していること
- Azure CLI のコマンドはAzure Cloud Shell のBash から実行とする
Terraform のモジュールとは
Terraform のモジュールは、複数のリソースや関連のあるリソースをまとめたファイル群です。Terraform では1つのtf ファイルでリソースの構成をまとめることもできますが、構成の規模が大きくなったり複数の環境でTerraform を利用したい時などで以下のような問題が発生します。
- コードの行数増加、複雑性が増すことでコード理解の難化、可読性の低下
- 簡単な修正を行うだけで依存関係にあるリソースに影響を与えてしまう
- 本番環境、ステージング環境のように環境を分離させたい場合、同じ構成のコードを複数回修正する必要がある
- 他のチームでTerraform を利用したい場合にコードの再利用がしにくくなる、など
上記のような問題に対しTerraform のモジュールを使うことで、構成の整理やカプセル化、コードの再利用、一貫性の保証を行い問題の解消ができます。
モジュールではルートモジュール、子モジュール、公開されたモジュールがあります。ルートモジュールはメインディレクトリ内で定義されたリソース構成となり、モジュールの構成を利用する場合はterraform apply をこのルートモジュールで実行します。子モジュールは他のモジュールから呼び出されるものを指し、1つのtf ファイル内で複数回同じ構成を利用したり複数のtf ファイルで使い回すこともできます。公開されたモジュールはパブリックレジストリやプライベートレジストリから呼び出すことのできるモジュールを指します。公式が提供しているモジュールや開発者が独自にコードを作成し公開しているモジュールなどがあります。
標準モジュール構造とは
標準モジュール構造は公式が推奨している別のリポジトリへの再利用可能なモジュール作成のためのディレクトリとファイル構造を指します。
標準モジュール構造では、以下の構造に従ってTerraform のディレクトリやファイルの作成を行います。
- リソースの作成を行うルートモジュールを作成する
- ルートモジュールとネストされたモジュールでREADME.md ファイルを作成し、モジュールの利用方法や構成について記載する
- モジュールを公開する場合、LICENSE ファイルを作成しモジュールのライセンス形態を記載する
- 空ファイルでもmain.tf、variables.tf、outputs.tf は作成する
- variables とoutputs には必ずdescription で説明を記載する
- ネストされたモジュールはmodules ディレクトリを作成し管理する。README.md の有無により外部利用か内部利用かが分かれる
- examples ディレクトリを作成し、モジュールの使用例を用意する
上記に加え、環境ごとにディレクトリを分けるためenvironments ディレクトリを追加すると、以下のような構造となります。今回は公開を目的としていないためLICENSE ファイルは除外しています。
$ tree
.
├── environments
│   ├── prod
│   │   ├── README.md
│   │   ├── main.tf
│   │   ├── outputs.tf
│   │   └── variables.tf
│   └── stag
│       ├── README.md
│       ├── main.tf
│       ├── outputs.tf
│       └── variables.tf
├── examples
│   └── main.tf
└── modules
    ├── compute
    │   ├── README.md
    │   ├── main.tf
    │   ├── outputs.tf
    │   └── variables.tf
    └── network
        ├── README.md
        ├── main.tf
        ├── outputs.tf
        └── variables.tf
Terraform モジュールのベストプラクティスについて
Terraform のモジュールに関するベストプラクティスでは、Google Cloud のベストプラクティスなどがあります。モジュールの命名規則や変数、出力などローカルのモジュールを作成する時に大事なことが記載されています。
今回の構成
今回作成するAzure リソースの構成は以下のとおりです。
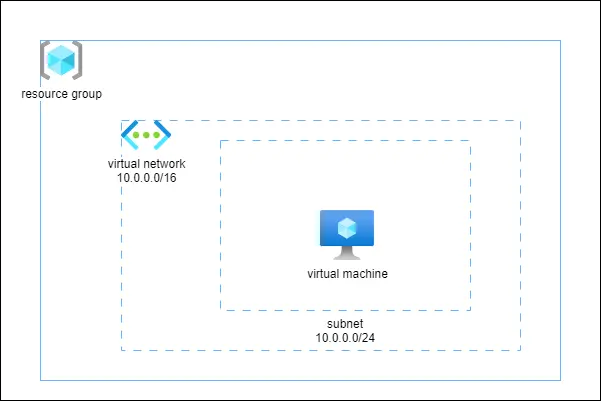
Terraform 用コードのディレクトリ構成は以下のとおりです。各環境についてはProduction 環境はprod、Staging 環境はstag で作成します。また、今回はモジュール構造の理解を目的とするため、Azure リソースの作成のみとしています。README.md ファイルについてはterraform-docs を利用して作成しています。
.
├── environments
│   ├── prod
│   │   ├── README.md
│   │   ├── main.tf
│   │   ├── outputs.tf
│   │   └── variables.tf
│   └── stag
│       ├── README.md
│       ├── main.tf
│       ├── outputs.tf
│       └── variables.tf
├── example
│   ├── main.tf
│   ├── outputs.tf
│   └── variables.tf
└── modules
    ├── compute
    │   ├── README.md
    │   ├── main.tf
    │   ├── outputs.tf
    │   └── variables.tf
    ├── network
    │   ├── README.md
    │   ├── main.tf
    │   ├── outputs.tf
    │   └── variables.tf
    └── resource_group
        ├── README.md
        ├── main.tf
        ├── outputs.tf
        └── variables.tf
resource_group モジュールの作成
初めにリソースグループ用のモジュールを作成します。README.md につきましては省略します。variables.tf ではリソースのベースとなる名前とリージョン、タグについて定義します。
variable "base_name" {
  type = string
  description = "The name of azure resource group."
}

variable "location" {
  type = string
  default     = "japaneast"
  description = "The location for azure resource group."
}

variable "tags" {
  type = map(any)
  description = "The tags for azure resource group."
  default = {}
}
main.tf ではvariables.tf で定義した変数を基にリソースグループの作成を定義します。
resource "azurerm_resource_group" "rg" {
  name = "${var.base_name}-rg"
  location = var.location
  tags = var.tags
}

outputs.tf では、他のAzure リソースでリソースグループ名とリージョン、タグを流用するため、これらをoutput として定義します。

```terraform:outputs.tf
output "resource_group_name" {
  value = azurerm_resource_group.rg.name
  description = "The resource group name for azure resources."
}

output "location" {
  value = azurerm_resource_group.rg.location
  description = "The location for azure resources"
}

output "tags" {
  value = azurerm_resource_group.rg.tags
  description = "The tags for azure resources."
}
network モジュールの作成
リソースグループのモジュールを作成後、仮想マシン作成に必要なネットワークリソースの作成を行います。ここでは以下Azure リソースを作成します。
- 仮想ネットワーク
- 仮想マシン用のサブネット
- ネットワークセキュリティグループ (以下NSG)
- NIC 用のパブリックIP アドレス
- 仮想マシンに関連付けをする仮想ネットワークインターフェース
variables.tf では上記Azure リソースを作成するために最低限必要な変数を定義します。
variable "resouce_group_name" {
  type = string
  description = "The name of resource group for azure resources."
}

variable "base_name" {
  type = string
  description = "The system base name for azure network resources."
}

variable "location" {
  type = string
  default     = "japaneast"
  description = "The location for azure resources."
}

variable "tags" {
  type = map(any)
  description = "The tag name for azure resources."
  default = {}
}

variable "address_space" {
  type = list(string)
  description = "The address space for azure vitrual network."
}

variable "address_prefix" {
  type = list(string)
  description = "The address prefix for subnet."
}
main.tf では仮想ネットワーク、サブネット、NSG、パブリックIP アドレス、NIC を作成します。NSG 用のポートなどはローカル変数として定義します。
resource "azurerm_network_security_group" "nsg" {
  name                = "${var.base_name}-nsg"
  location            = var.location
  resource_group_name = var.resouce_group_name

  security_rule {
    name                       = local.ssh_rule_name
    priority                   = local.ssh_rule_priority
    direction                  = local.ssh_rule_direction
    access                     = local.ssh_rule_access
    protocol                   = local.ssh_rule_protocol
    source_port_range          = local.ssh_rule_source_port_range
    destination_port_range     = local.ssh_rule_destination_port_range
    source_address_prefix      = local.ssh_rule_source_address_prefix
    destination_address_prefix = local.ssh_rule_destination_address_prefix
  }

  tags = var.tags
}

resource "azurerm_virtual_network" "vnet" {
  name                = "${var.base_name}-vnet"
  location            = azurerm_network_security_group.nsg.location
  resource_group_name = azurerm_network_security_group.nsg.resource_group_name
  address_space       = var.address_space

  tags = var.tags
}

resource "azurerm_subnet" "snet" {
  name                 = "${var.base_name}-snet"
  resource_group_name  = azurerm_network_security_group.nsg.resource_group_name
  virtual_network_name = azurerm_virtual_network.vnet.name
  address_prefixes     = var.address_prefix
}

resource "azurerm_public_ip" "pip" {
  name                = "${var.base_name}-pip"
  location            = azurerm_network_security_group.nsg.location
  resource_group_name = azurerm_network_security_group.nsg.resource_group_name
  sku = "Standard"
  allocation_method   = "Static"

  tags = var.tags
}

resource "azurerm_network_interface" "nic" {
  name                = "${var.base_name}-nic"
  location            = azurerm_network_security_group.nsg.location
  resource_group_name = azurerm_network_security_group.nsg.resource_group_name

  ip_configuration {
    name                          = "${var.base_name}-nicconf"
    subnet_id                     = azurerm_subnet.snet.id
    private_ip_address_allocation = "Dynamic"
    public_ip_address_id          = azurerm_public_ip.pip.id
  }
}

resource "azurerm_network_interface_security_group_association" "nic-association" {
  network_interface_id      = azurerm_network_interface.nic.id
  network_security_group_id = azurerm_network_security_group.nsg.id
}

locals {
  ssh_rule_name                       = "allow_ssh"
  ssh_rule_priority                   = 100
  ssh_rule_direction                  = "Inbound"
  ssh_rule_access                     = "Allow"
  ssh_rule_protocol                   = "Tcp"
  ssh_rule_source_port_range          = "*"
  ssh_rule_destination_port_range     = "22"
  ssh_rule_source_address_prefix      = "*"
  ssh_rule_destination_address_prefix = "*"
}
outputs.tf では、仮想マシン用にNIC のid が必要となるためNIC のid を定義します。
output "network_interface" {
  value = azurerm_network_interface.nic.id
}
compute モジュールの作成
network モジュールの作成後、仮想マシン作成用のcompute モジュールを作成します。compute モジュールでは以下のリソースを作成します。
- 仮想マシン
- 仮想ディスク
variables.tf では上記Azure リソースを作成するために最低限必要な変数を定義します。
variable "resouce_group_name" {
  type = string
  description = "The name of resource group for azure resources."
}

variable "base_name" {
  type = string
  description = "The system base name for azure network resources."
}

variable "location" {
  type = string
  default     = "japaneast"
  description = "The location for azure resources."
}

variable "tags" {
  type = map(any)
  description = "The tag name for azure resources."
  default = {}
}

variable "network_interface_id" {
  type = string
  description = "The network interface id for azure vm"
}

variable "vm_size" {
  type = string
  description = "The vm size for azure vm."
}

variable "image_publisher" {
  type = string
  description = "The image name for azure vm."
}

variable "image_offer" {
  type = string
  description = "The image offer for azure vm."
}

variable "image_sku" {
  type = string
  description = "The image sku for azure vm."
}

variable "image_version" {
  type = string
  description = "The image version for azure vm."
}

variable "os_disk_cache" {
  type = string
  description = "The OS disk cache for azure vm disk."
}

variable "os_disk_create_option" {
  type = string
  description = "The OS disk create option for azure vm disk."
}

variable "os_managed_disk_type" {
  type = string
  description = "The OS managed disk type for azure vm disk."
}

variable "vm_computer_name" {
  type = string
  description = "The computer name for azure vm."
}

variable "vm_admin_username" {
  type = string
  sensitive = true
  description = "The admin username for azure vm."
}

variable "vm_admin_password" {
  type = string
  sensitive = true
  description = "The admin user password for azure vm."
}
main.tf では仮想マシン、仮想ディスクを作成します。今回はモジュール構成での作成を目的としているため、仮想マシンのログインはユーザー名とパスワードを設定していますが、実際に作成する時はセキュリティを考慮してSSH 用の鍵などを利用するようにしてください。
resource "azurerm_virtual_machine" "main" {
  name                  = "${var.base_name}-vm"
  location              = var.location
  resource_group_name   = var.resouce_group_name
  network_interface_ids = [var.network_interface_id]

  vm_size               = var.vm_size

  storage_image_reference {
    publisher = var.image_publisher
    offer     = var.image_offer
    sku       = var.image_sku
    version   = var.image_version
  }

  storage_os_disk {
    name              = "${var.base_name}-disk"
    caching           = var.os_disk_cache
    create_option     = var.os_disk_create_option
    managed_disk_type = var.os_managed_disk_type
  }

  os_profile {
    computer_name  = var.vm_computer_name
    admin_username = var.vm_admin_username
    admin_password = var.vm_admin_password
  }

  os_profile_linux_config {
    disable_password_authentication = false
  }

  delete_data_disks_on_termination = true

  tags = var.tags
}
outputs.tf ではパブリックIP アドレスを出力させたりしますが、今回はリソース作成を目的としているため空ファイルを用意します。
ルートモジュールの作成
モジュールが一通り作成できたら、最後にルートモジュールを作成します。今回の記事ではProduction の内容のみ出すため、stag やexample についてはGitHub のサンプルコードを見てください。
variables.tf では各モジュールで利用する変数を定義します。今回はリソースの作成を目的としているため、VM のパスワードをdefault の値としています。シークレットをプレーンテキストで貼るのはセキュリティ上良くないため、実務などでは利用しないようにしてください。また、リソースで利用する値はdefault 値として定義します。
variable "base_name" {
  type = string
  description = "The name of azure resource group."
  default = "prodmoduledemo"
}

variable "location" {
  type = string
  description = "The location for azure resource group."
  default     = "japaneast"
}

variable "tags" {
  type = map(any)
  description = "The tags for azure resource group."
  default = {
    environment: "Production"
  }
}

variable "address_space" {
  type = list(string)
  description = "The address space for azure vitrual network."
  default = [ "10.0.0.0/16" ]
}

variable "address_prefix" {
  type = list(string)
  description = "The address prefix for subnet."
  default = [ "10.0.0.0/24" ]
}

variable "vm_size" {
  type = string
  description = "The vm size for azure vm."
  default = "Standard_DS1_v2"
}

variable "image_publisher" {
  type = string
  description = "The image publisher for azure vm."
  default = "Canonical"
}

variable "image_offer" {
  type = string
  description = "The image offer for azure vm."
  default = "0001-com-ubuntu-server-jammy"
}

variable "image_sku" {
  type = string
  description = "The image sku for azure vm."
  default = "22_04-lts"
}

variable "image_version" {
  type = string
  description = "The image version for azure vm."
  default = "latest"
}

variable "os_disk_cache" {
  type = string
  description = "The OS disk cache for azure vm disk."
  default = "ReadWrite"
}

variable "os_disk_create_option" {
  type = string
  description = "The OS disk create option for azure vm disk."
  default = "FromImage"
}

variable "os_managed_disk_type" {
  type = string
  description = "The OS managed disk type for azure vm disk."
  default = "Standard_LRS"
}

variable "vm_computer_name" {
  type = string
  description = "The vm computer name for azure vm."
  default = "prodmoduledemo"
}

variable "vm_admin_username" {
  type = string
  description = "The vm admin username for azure vm."
  default = "moduledemouser"
}

variable "vm_admin_password" {
  type = string
  description = "The vm admin password for azure vm."
  default = "!QAZWS#ED4gh"
}
main.tf では、module を利用し作成したモジュールを呼び出し、各モジュールで必須となる値を入力していきます。
terraform {
  required_version = ">= 1.0.0, < 2.0.0"

  required_providers {
    azurerm = {
      source  = "hashicorp/azurerm"
      version = "~>3.0"
    }
  }
}

provider "azurerm" {
  features {}
}

# Resource group module
module "resource_group" {
  source = "../../modules/resource_group"

  base_name = var.base_name
  location = var.location
  tags = var.tags
}

# Network module
module "network" {
  source = "../../modules/network"

  base_name = var.base_name
  resouce_group_name = module.resource_group.resource_group_name
  address_space = var.address_space
  address_prefix = var.address_prefix
  tags = module.resource_group.tags
}

# Compute module
module "compute" {
  source = "../../modules/compute"

  base_name = var.base_name
  resouce_group_name = module.resource_group.resource_group_name
  network_interface_id = module.network.network_interface
  vm_size = var.vm_size

  image_publisher = var.image_publisher
  image_offer = var.image_offer
  image_sku = var.image_sku
  image_version = var.image_version

  os_disk_cache = var.os_disk_cache
  os_disk_create_option = var.os_disk_create_option
  os_managed_disk_type = var.os_managed_disk_type

  vm_computer_name = var.vm_computer_name
  vm_admin_username = var.vm_admin_username
  vm_admin_password = var.vm_admin_password

  tags = module.resource_group.tags
}
outputs.tf に関してはmain.tf 以降で特に利用がないため空ファイルを作成します。一通り作成したら、Terraform のモジュールを初期化し、構文チェック後にAzure リソースを作成します。
# Terraformのモジュールを初期化する
terraform init

# Terraformファイルの構文をチェックする
terraform validate

# Terraformで作成されるリソースを確認する
terraform plan

# TerraformでAzureリソースを作成する
terraform apply
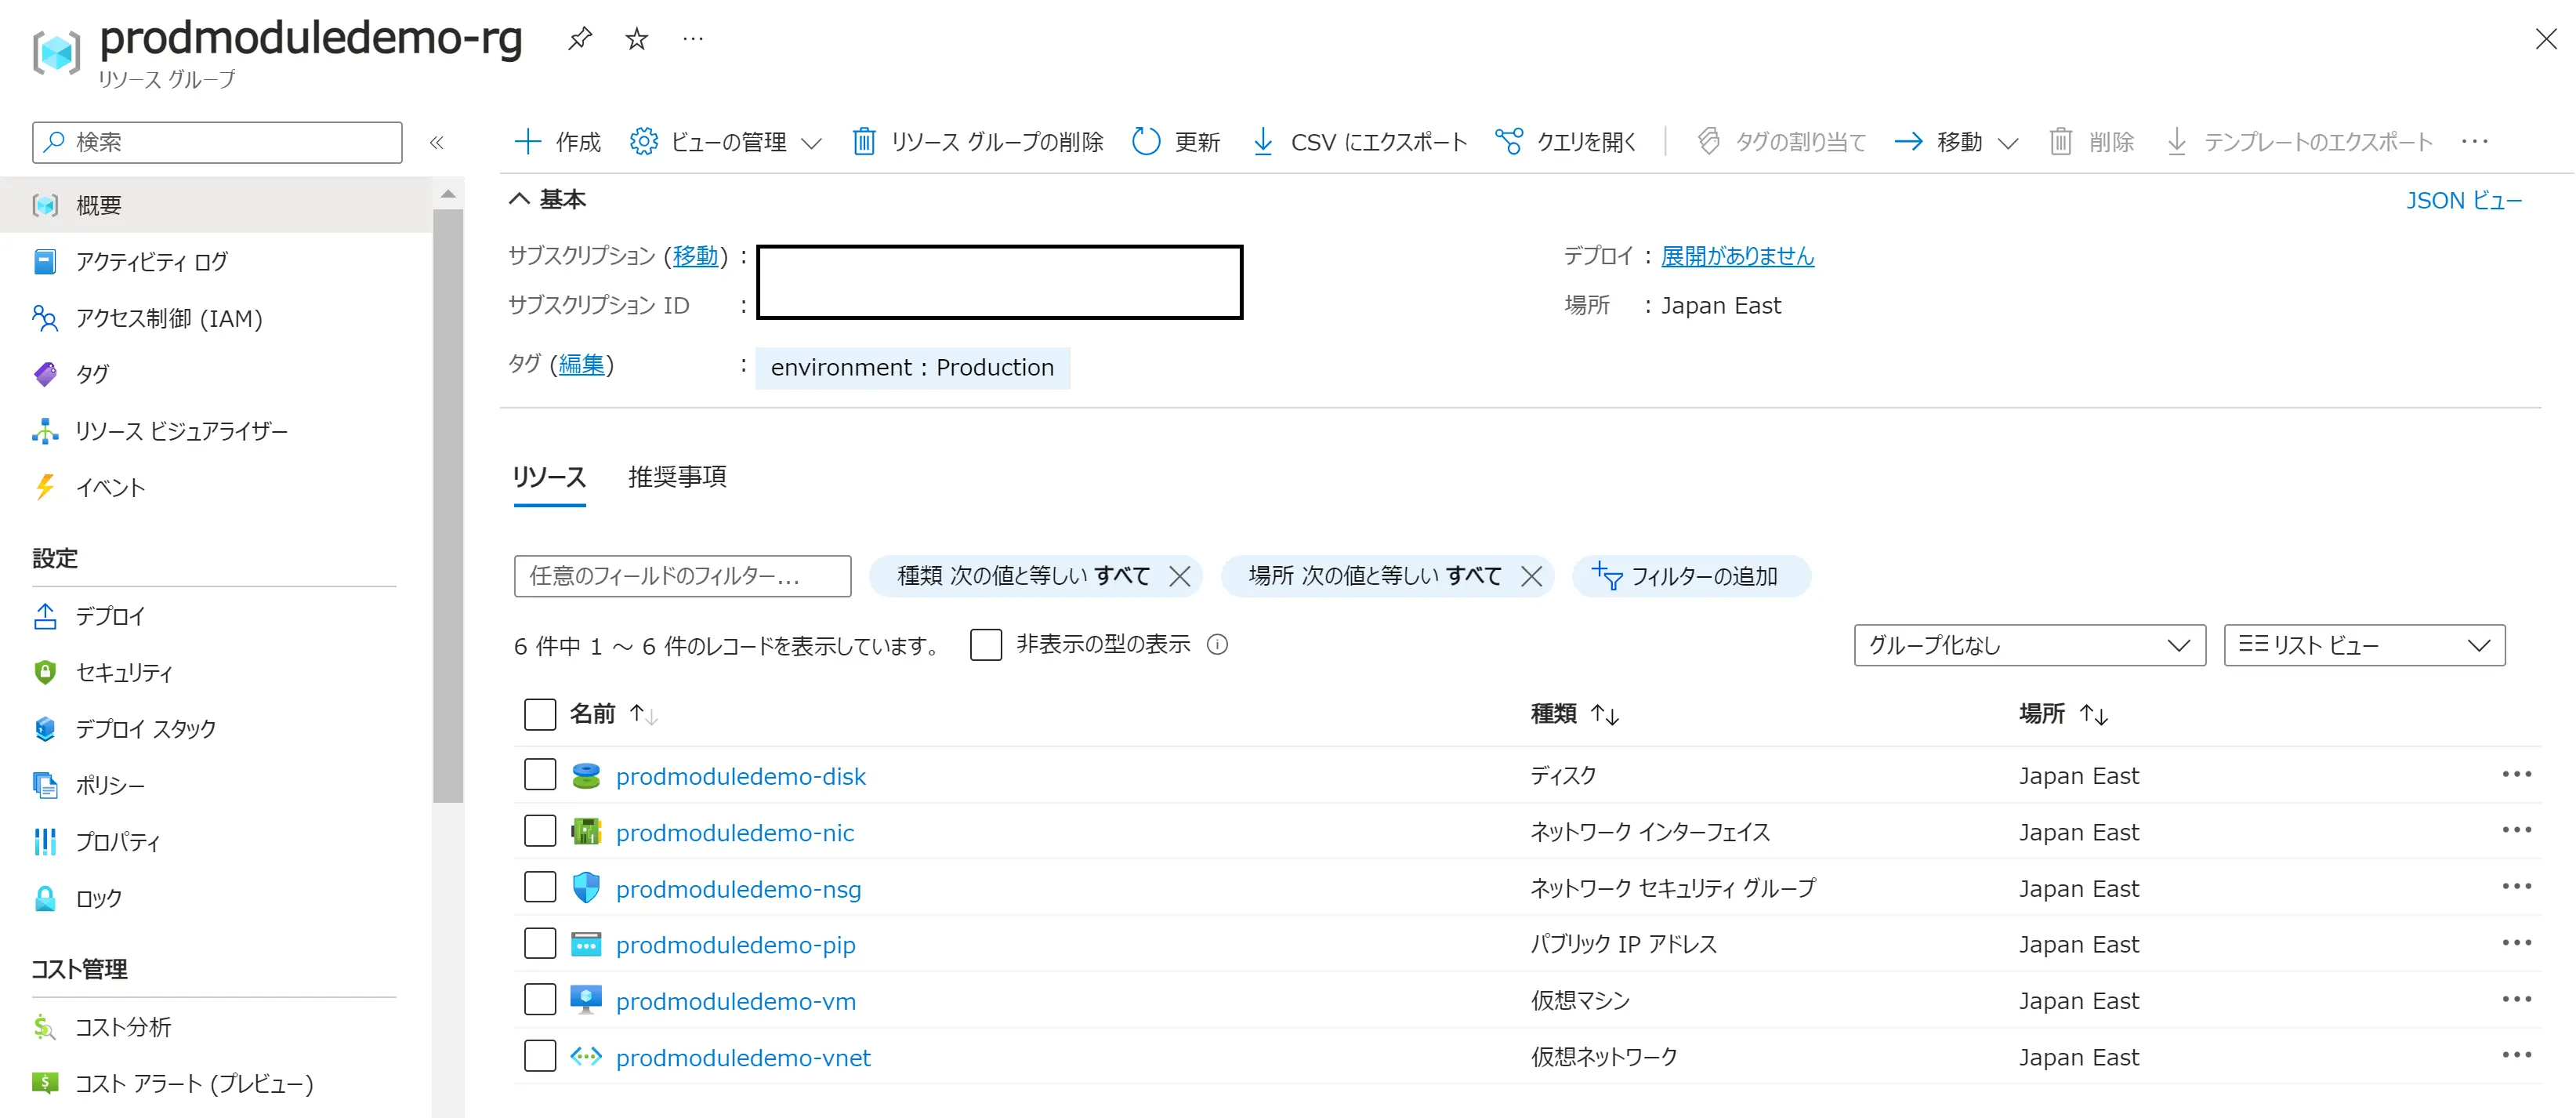
Azure リソースの確認
Terraform 実行後、Azure Portal から以下のAzure リソースが作成されたことを確認します。
- リソースグループ
- 仮想ネットワーク
- ネットワークセキュリティグループ
- パブリックIP アドレス
- 仮想ネットワークインターフェース
- 仮想マシン
- 仮想ディスク
リソースのクリーンアップ
Azure リソースを残しておくと課金が発生するため、terraform destroy でリソースをクリーンアップします。
# Azureリソースをクリーンアップする
terraform destroy
まとめ
- Terraform のモジュールを利用することで構成の整理やカプセル化、コードの再利用、一貫性の保証ができる
- 標準モジュール構造ではmain.tf、variables.tf、outputs.tf など各役割ごとにファイルを分割している
- モジュールをレポジトリなどに公開することもできる